New Game
If you have a game idea that you want to see added to the site then you can create it yourself!
Process
Section titled “Process”1. Initial Objectives
Section titled “1. Initial Objectives”First create a list of all the initial objectives using the website editor. Aim to create at least 100 objectives. You may need to create more but this is a good starting point.
2. Categories & Limits
Section titled “2. Categories & Limits”Next, now that we have an idea of the objectives, we can create categories and limits for them. These help balance the board - see Board Generation for more information.
Create the categories in the Manage Categories & Limits dialog and then apply them appropriately to the objectives.
3. Playtest
Section titled “3. Playtest”At this point, you should and can playtest the game. Get a feel for it and adjust the goals, categories and limits as needed! Or add new objectives if you think of any.
4. Review & Submit
Section titled “4. Review & Submit”Review the game and ensure it’s ready to submit. If you’re including images, prep those too.
Then head to the Discord and run the /submit-game command in the post you created in the suggest-new-game channel.
Not every request will be guaranteed to be added to the site.
Images/Icons
Section titled “Images/Icons”For a new games goal set to be added, it must have images for all objectives.
To set the image(s) a goal should use, click + Add Blank in the icon section of the goal. Click on the icon it adds to rename it. Every icon should have the same category i.e. for Super Mario Odyssey, all the icons should be smo/icon_name:
smo/collect_moons.webpsmo/get_outfits.webpsmo/checkpoints.webpIf you cannot create the images yourself then we can try to accomodate making them for you, but this isn’t guaranteed and could take significantly more time.
Sizes & Format
Section titled “Sizes & Format”Images for the goals should be:
- 512x512 or 1024x1024
- PNG or WEBP
- Short but descriptive names (so they’re searchable), no spaces or special characters, lowercase e.g
final_boss_no_weapon.png - Some padding around the image is usually recommended
You cannot use images created by someone else. You must make them yourself, either from scratch or using/modifying existing “fair use”game assets.
Layout
Section titled “Layout”Avoid placing anything in the
- top right of the image (used to mark progress during a game)
- bottom left (used to indicate the range/amount for a goal).
The top left is usually a good place to indicate anything specific/unique for similar goals, e.g. Collect 10 outfits might use a top left icon for the location.
For example:
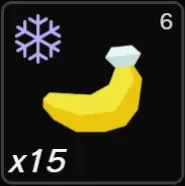
This is 15 unique bananas in Freezer layer.
- Bananes is indicated in the middle
- The top left ice icon indicates the location “freezer layer”
- The range
15is shown in the bottom left - The current progress of
6is shown in the top right - Nothing is needed in the bottom right in this case
It is also advisable to avoid:
- Images that contain specific hard-baked details. For example for the objective
Collect 100 Coins, don’t place the text100over an image of the coins. This restricts any future changes or re-use of the image, i.e. it’s later changed toCollect 150 Coins. The site can show values for you. - Large amount of highly varied range options. Having incredibly large ranges can impact a goals difficulty too much, making it hard to balance. For example, having a
Get {{X}} goldgoal with a range from 100 to 5000.
Not all images will be guaranteed to be used on the site.
Guidelines
Section titled “Guidelines”- It’s expected that players, to start with, may need to learn what the goal images represent. Therefore, although images should be clear and easy to understand, they don’t need to be instantly recognisable.
- Images should be unique for each goal. For instance, you should be able to take a screenshot of any board and be able to identify every goal just by the images, with no ambiguity.